申请key
登录高德,注册,增加利用,创立key
官网api:
https://lbs.amap.com/api/webs...
调用步骤:
第一步,申请”web服务 API”密钥(Key);
第二步,拼接HTTP申请URL,第一步申请的Key需作为必填参数一起发送;
第三步,接管HTTP申请返回的数据(JSON或XML格局),解析数据。
如无非凡申明,接口的输出参数和输入数据编码全副对立为UTF-8。
最次要的也是获取到key
相干代码
pom.xml
<!--httpclient--> <dependency> <groupId>org.apache.httpcomponents</groupId> <artifactId>httpclient</artifactId> <version>4.4</version> </dependency> <!-- https://mvnrepository.com/artifact/com.alibaba/fastjson --> <dependency> <groupId>com.alibaba</groupId> <artifactId>fastjson</artifactId> <version>1.2.78</version> </dependency><dependency> <groupId>org.apache.commons</groupId> <artifactId>commons-lang3</artifactId> <version>3.4</version></dependency>举荐浏览:《Spring Boot+Vue全栈开发实战》,点此获取PDF文件完整版
application.properties
server.port=2080#The config for HttpClienthttp.maxTotal=300http.defaultMaxPerRoute=50http.connectTimeout=1000http.connectionRequestTimeout=500http.socketTimeout=5000http.staleConnectionCheckEnabled=truegaode.key = 申请的keyHttpClientConfig
package com.zjy.map.config;import lombok.Data;import org.apache.http.client.HttpClient;import org.apache.http.client.config.RequestConfig;import org.apache.http.conn.HttpClientConnectionManager;import org.apache.http.impl.client.HttpClientBuilder;import org.apache.http.impl.conn.PoolingHttpClientConnectionManager;import org.springframework.boot.context.properties.ConfigurationProperties;import org.springframework.context.annotation.Bean;import org.springframework.context.annotation.Configuration;import org.springframework.http.client.ClientHttpRequestFactory;import org.springframework.http.client.HttpComponentsClientHttpRequestFactory;import org.springframework.http.converter.HttpMessageConverter;import org.springframework.http.converter.StringHttpMessageConverter;import org.springframework.web.client.RestTemplate;import java.nio.charset.Charset;import java.util.List;@Data@Configuration@ConfigurationProperties(prefix = "http", ignoreUnknownFields = true)public class HttpClientConfig {private Integer maxTotal;// 最大连贯private Integer defaultMaxPerRoute;// 每个host的最大连贯private Integer connectTimeout;// 连贯超时工夫private Integer connectionRequestTimeout;// 申请超时工夫private Integer socketTimeout;// 响应超时工夫/** * HttpClient连接池 * @return */@Beanpublic HttpClientConnectionManager httpClientConnectionManager() { PoolingHttpClientConnectionManager connectionManager = new PoolingHttpClientConnectionManager(); connectionManager.setMaxTotal(maxTotal); connectionManager.setDefaultMaxPerRoute(defaultMaxPerRoute); return connectionManager;}/** * 注册RequestConfig * @return */@Beanpublic RequestConfig requestConfig() { return RequestConfig.custom().setConnectTimeout(connectTimeout) .setConnectionRequestTimeout(connectionRequestTimeout).setSocketTimeout(socketTimeout) .build();}/** * 注册HttpClient * @param manager * @param config * @return */@Beanpublic HttpClient httpClient(HttpClientConnectionManager manager, RequestConfig config) { return HttpClientBuilder.create().setConnectionManager(manager).setDefaultRequestConfig(config) .build();}@Beanpublic ClientHttpRequestFactory requestFactory(HttpClient httpClient) { return new HttpComponentsClientHttpRequestFactory(httpClient);}/** * 应用HttpClient来初始化一个RestTemplate * @param requestFactory * @return */@Beanpublic RestTemplate restTemplate(ClientHttpRequestFactory requestFactory) { RestTemplate template = new RestTemplate(requestFactory); List<HttpMessageConverter<?>> list = template.getMessageConverters(); for (HttpMessageConverter<?> mc : list) { if (mc instanceof StringHttpMessageConverter) { ((StringHttpMessageConverter) mc).setDefaultCharset(Charset.forName("UTF-8")); } } return template;}举荐浏览:《Spring Boot+Vue全栈开发实战》,点此获取PDF文件完整版
WeatherUtils
package com.zjy.map.utils;import com.alibaba.fastjson.JSONArray;import com.alibaba.fastjson.JSONObject;import org.apache.http.client.methods.CloseableHttpResponse;import org.apache.http.client.methods.HttpGet;import org.apache.http.client.utils.URIBuilder;import org.apache.http.impl.client.CloseableHttpClient;import org.apache.http.impl.client.HttpClients;import org.apache.http.util.EntityUtils;import org.slf4j.Logger;import org.slf4j.LoggerFactory;import org.springframework.beans.factory.annotation.Value;import org.springframework.stereotype.Component;import java.net.URI;import java.util.Map;@Componentpublic class WeatherUtils {/**日志对象*/private static final Logger logger = LoggerFactory.getLogger(WeatherUtils.class);@Value("${gaode.key}")private String KEY;public final String WEATHER_URL = "https://restapi.amap.com/v3/weather/weatherInfo?";/** * 发送get申请 * @return */public JSONObject getCurrent(Map<String, String> params){ JSONObject jsonObject = null; CloseableHttpClient httpclient = HttpClients.createDefault(); // 创立URI对象,并且设置申请参数 try { URI uri = getBuilderCurrent(WEATHER_URL, params); // 创立http GET申请 HttpGet httpGet = new HttpGet(uri); CloseableHttpResponse response = httpclient.execute(httpGet); // 判断返回状态是否为200 jsonObject = getRouteCurrent(response); httpclient.close(); } catch (Exception e) { e.printStackTrace(); } return jsonObject;}/** * 依据不同的门路布局获取间隔 * @param response * @return */private static JSONObject getRouteCurrent(CloseableHttpResponse response) throws Exception{ JSONObject live = null; // 判断返回状态是否为200 if (response.getStatusLine().getStatusCode() == 200) { String content = EntityUtils.toString(response.getEntity(), "UTF-8"); logger.info("调用高德地图接口返回的后果为:{}",content); JSONObject jsonObject = (JSONObject) JSONObject.parse(content); JSONArray lives = (JSONArray) jsonObject.get("lives"); live = (JSONObject) lives.get(0); logger.info("返回的后果为:{}",JSONObject.toJSONString(live)); } return live;}/** * 封装URI * @param url * @param params * @return * @throws Exception */private URI getBuilderCurrent(String url, Map<String, String> params) throws Exception{ // 城市编码,高德地图提供 String adcode = params.get("adcode"); URIBuilder uriBuilder = new URIBuilder(url); // 公共参数 uriBuilder.setParameter("key", KEY); uriBuilder.setParameter("city", adcode); logger.info("申请的参数key为:{}, cityCode为:{}", KEY, adcode); URI uri = uriBuilder.build(); return uri;}/** * 查问将来的 * 发送get申请 * @return */public JSONObject sendGetFuture(Map<String, String> params){ JSONObject jsonObject = null; CloseableHttpClient httpclient = HttpClients.createDefault(); // 创立URI对象,并且设置申请参数 try { URI uri = getBuilderFuture(WEATHER_URL, params); // 创立http GET申请 HttpGet httpGet = new HttpGet(uri); CloseableHttpResponse response = httpclient.execute(httpGet); // 判断返回状态是否为200 jsonObject = getRouteFuture(response); httpclient.close(); } catch (Exception e) { e.printStackTrace(); } return jsonObject;}/** * 封装URI * @param url * @param params * @return * @throws Exception */private URI getBuilderFuture(String url, Map<String, String> params) throws Exception{ // 城市编码,高德地图提供 String adcode = params.get("adcode"); URIBuilder uriBuilder = new URIBuilder(url); // 公共参数 uriBuilder.setParameter("key", KEY); uriBuilder.setParameter("city", adcode); uriBuilder.setParameter("extensions", "all"); logger.info("申请的参数key为:{}, cityCode为:{}", KEY, adcode); URI uri = uriBuilder.build(); return uri;}/** * 依据不同的门路布局获取间隔 * @param response * @return */private static JSONObject getRouteFuture(CloseableHttpResponse response) throws Exception{ JSONObject live = null; // 判断返回状态是否为200 if (response.getStatusLine().getStatusCode() == 200) { String content = EntityUtils.toString(response.getEntity(), "UTF-8"); logger.info("调用高德地图接口返回的后果为:{}",content); JSONObject jsonObject = (JSONObject) JSONObject.parse(content); JSONArray forecast = (JSONArray) jsonObject.get("forecasts"); live = (JSONObject) forecast.get(0); logger.info("返回的后果为:{}",JSONObject.toJSONString(live)); } return live;}举荐浏览:《Spring Boot+Vue全栈开发实战》,点此获取PDF文件完整版
WeatherController
package com.zjy.map.controller;import com.alibaba.fastjson.JSONObject;import com.zjy.map.utils.WeatherUtils;import org.slf4j.Logger;import org.slf4j.LoggerFactory;import org.springframework.beans.factory.annotation.Autowired;import org.springframework.web.bind.annotation.GetMapping;import org.springframework.web.bind.annotation.RequestMapping;import org.springframework.web.bind.annotation.RequestParam;import org.springframework.web.bind.annotation.RestController;import java.util.HashMap;import java.util.Map;/** * 高德天气 */ @RestController @RequestMapping("/weather") public class WeatherController { @Autowired private WeatherUtils weatherUtils; /**日志对象*/ private static final Logger logger = LoggerFactory.getLogger(WeatherController.class); /** * http://localhost:2080/weather/getCurrent?adcode=140200 * 获取以后的天气预报 * @param adcode * @return */ @GetMapping("/getCurrent") public JSONObject getWeather(@RequestParam String adcode){ Map<String, String> params = new HashMap<>(); params.put("adcode", adcode); logger.info("获取以后的天气预报,申请的参数为:{}", params); JSONObject map = weatherUtils.getCurrent(params); logger.info("获取以后的天气预报,返回的申请后果为:{}", map); return map; } /** * http://localhost:2080/weather/getFuture?adcode=140200 * 获取将来的天气预报 * @param adcode * @return */ @GetMapping("/getFuture") public JSONObject getFuture(@RequestParam String adcode){ Map<String, String> params = new HashMap<>(); params.put("adcode", adcode); logger.info("获取将来的天气预报,申请的参数为:{}", params); JSONObject map = weatherUtils.sendGetFuture(params); logger.info("获取将来的天气预报,返回的申请后果为:{}", map); return map; }
代码贴完了。开始测试启动服务**举荐浏览:**[《Spring Boot+Vue全栈开发实战》,点此获取PDF文件完整版](https://docs.qq.com/doc/DQ05qV0xDdGNoRU16)城市编号官网提供下载地址:https://lbs.amap.com/api/webservice/download这里获取以后工夫的天气情况与将来天气情况返回数据不一样,所在写了2个办法,参数只有一个,城市编码.1.获取以后天气http://localhost:2080/weather/getCurrent?adcode=140200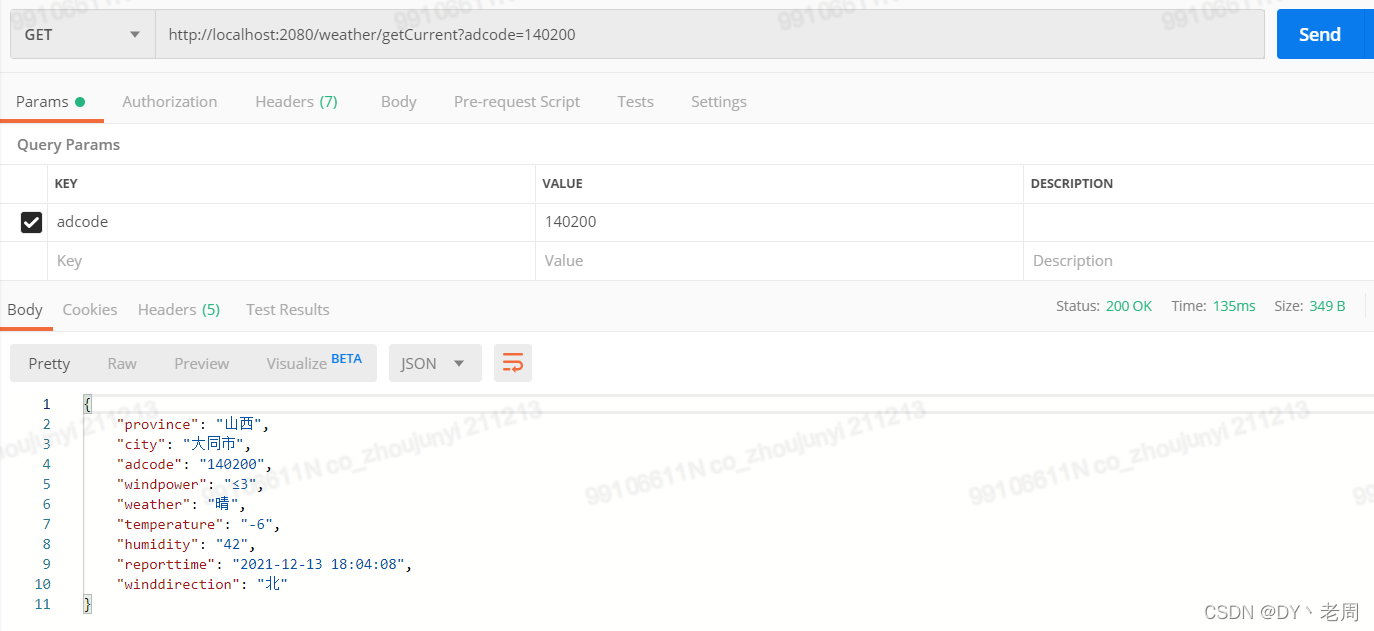2.获取将来天气http://localhost:2080/weather/getFuture?adcode=140200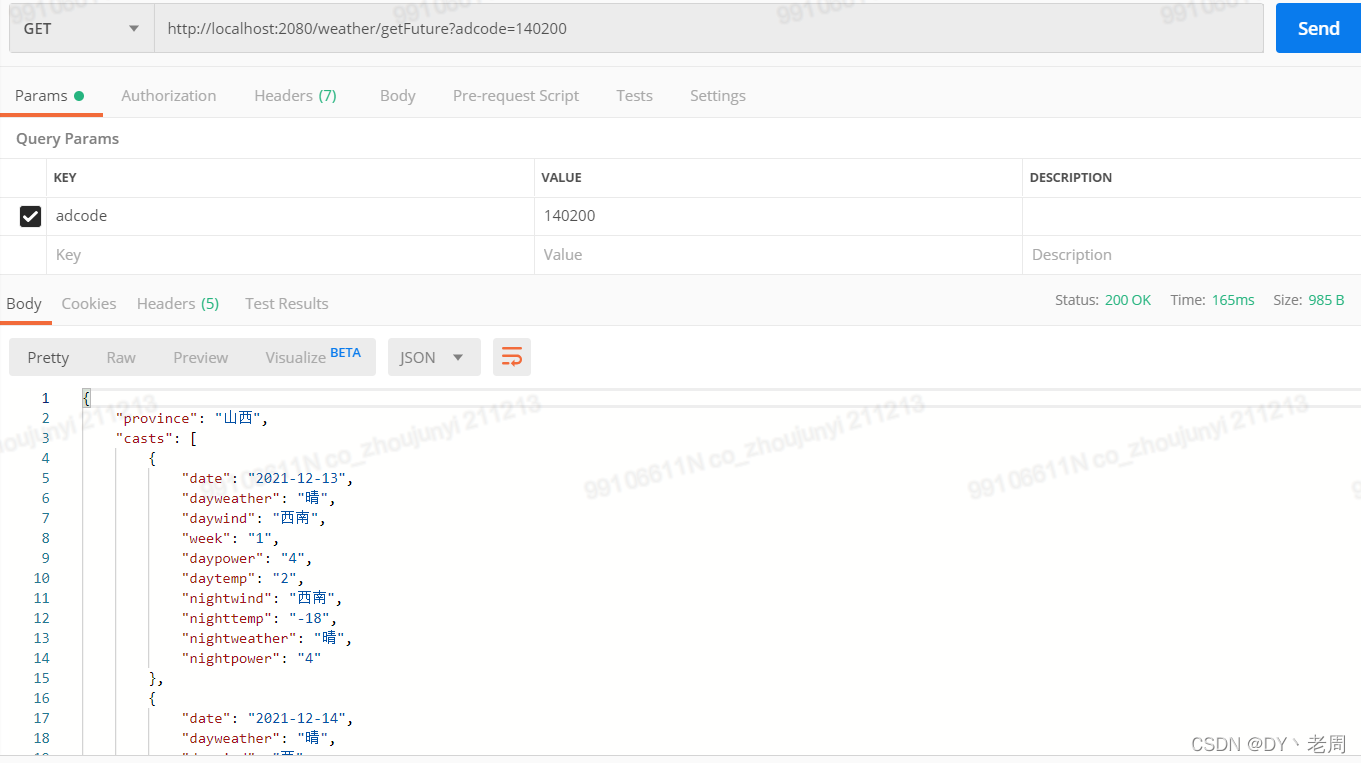 { "province": "山西", "casts": [ { "date": "2021-12-13", "dayweather": "晴", "daywind": "东北", "week": "1", "daypower": "4", "daytemp": "2", "nightwind": "东北", "nighttemp": "-18", "nightweather": "晴", "nightpower": "4" }, { "date": "2021-12-14", "dayweather": "晴", "daywind": "西", "week": "2", "daypower": "≤3", "daytemp": "2", "nightwind": "西", "nighttemp": "-13", "nightweather": "晴", "nightpower": "≤3" }, { "date": "2021-12-15", "dayweather": "多云", "daywind": "东北", "week": "3", "daypower": "4", "daytemp": "5", "nightwind": "东北", "nighttemp": "-12", "nightweather": "多云", "nightpower": "4" }, { "date": "2021-12-16", "dayweather": "多云", "daywind": "东南", "week": "4", "daypower": "4", "daytemp": "-1", "nightwind": "东南", "nighttemp": "-18", "nightweather": "晴", "nightpower": "4" } ], "city": "大同市", "adcode": "140200", "reporttime": "2021-12-13 18:04:08" }测试OK!**举荐浏览:**[《Spring Boot+Vue全栈开发实战》,点此获取PDF文件完整版](https://docs.qq.com/doc/DQ05qV0xDdGNoRU16)