此前文章猪齿鱼 Agent——基于GitOps的云原生继续交付模型介绍了Choerodon Agent基于helm2版本在猪齿鱼平台继续交付部署流水线中的作用以及实现原理。
当初最新helm版本曾经到helm3,持续应用helm2会面临着如下问题:
- helm2版本应用的k8s api较老,不利于Choerodon Agent对k8s高版本进行反对
- helm2架构是client-server架构。其中tiller-pod须要高集群权限,不不便集群中权限治理。同时在Choerodon Agent这边又属于客户端,呈现问题后不不便进行调试
因而Choerodon Agent须要反对helm3版本,同时迁徙helm2版本下装置的实例。
helm2与helm3区别
- tiller被删除
如图所示,helm2中部署Release须要通过tiller-pod,然而在helm3就间接通过kubeconfig部署实例
- helm2中Release是全局资源,在helm3中Release存储在各自的命名空间
- Values反对JSON Schema校验器,主动查看所有输出的变量格局
- 移除了用于本地长期搭建Chart Repository的helm serve 命令
- helm install 不再默认生成一个Release的名称,除非指定了–generate-name
Helm Cli个别更名
helm2到helm3的迁徙
helm2到helm3的迁徙包含如下步骤:
- helm2的配置迁徙
- helm2的release迁徙
革除helm2的配置、release数据以及Tileer deployment
应用helm-2to3进行数据迁徙
装置2to3插件
helm3 plugin install https://github.com/helm/helm-2to3插件个性
反对性能:
- 迁徙helm2的配置
- 迁徙helm2的releases
革除helm2的配置,rel ease 数据以及Tiller deployment
迁徙helm2的配置
首先须要迁徙helm2的配置和数据文件夹,包含如下内容:
- Chart starters
- Repositories
- Plugins
通过如下命令开始迁徙:
helm3 2to3 move config迁徙helm2的实例
通过如下命令开始迁 移:
helm3 2to3 convert [ReleaseName]革除helm2的数据
如果迁徙实现后没有呈现谬误,就能够通过 此条命令分明helm2的数据,包含如下内容:
- Configuration(Helm homedirectory)
- v2release data
- Tiller deployment
通过如下命令开始分明数据:
helm3 2to3 cleanup留神:如果运行分明命令,所有被删掉的 数据都不能复原。所以没必要的话,还是将以前的数据保留下来
Choerodon Agent的降级解决
helm2到helm3的变动十分大,所以Choerdon Agent调用helm也产生巨大变化。其中有两局部须要进行批改
- helm客户端获取、装置、降级、卸载实例须要重构
须要迁徙helm2装置的实例到helm3,不然降级后Choerodon Agent无奈持续治理以前的实例
helm客户端重构
在helm2的时候,Choerodon Agent间接将helm源代码作为Choerodon Agent局部代码进行应用。而在helm3,间接对helm3的源码进行二次开发,而后通过依赖援用。这样做的益处是将helm代码与Choerodon Agent代码解藕,有利于helm相干代码更新降级。
在Choerodon Agent外面,装置或降级实例会对Chart中的资源增加Choeordon Agent相干的label,比方choerodon.io/release、choeroodn.io/command等等,所以helm3的二次开发次要是增加资源label,以装置(Install)操作举例,其余操作(降级、删除)大同小异。%E6%93%8D%E4%BD%9C%E4%B8%BE%E4%BE%8B%EF%BC%8C%E5%85%B6%E4%BB%96%E6%93%8D%E4%BD%9C(%E5%8D%87%E7%BA%A7%E3%80%81%E5%88%A0%E9%99%A4)%E5%A4%A7%E5%90%8C%E5%B0%8F%E5%BC%82%E3%80%82)
1. 批改模块名称
进行二次开发,首先须要批改该项目标模块名称,该步骤也是最麻烦的,因为批改后须要批改代码外面所有的包援用门路
如图所示,go.mod文件中的module进行如下批改
github.com/choerodon/helm => github.com/open-hand/helm而后代码文件中批改援用门路
2. 退出增加label逻辑
通过断点调试,找到helm3装置逻辑由open-hand-helm/pkg/action/install.go::Run()办法实现,在该办法中插入增加标签步骤。上面省略不必要的代码
func (i *Install) Run(chrt *chart.Chart, vals map[string]interface{}, valsRaw string) (*release.Release, error) { // ···省略的步骤是helm对chart包进行校验渲染,生成k8s对象,并保留到resources变量中 // 以下为批改的内容,遍历resources对象,增加Label for _, r := range resources { err = action.AddLabel(i.ImagePullSecret, i.Command, i.AppServiceId, r, i.ChartVersion, i.ReleaseName, i.ChartName, i.AgentVersion, "", i.TestLabel, i.IsTest, false, nil) if err != nil { return nil, err } } // ···省略的步骤是helm将resources更新到集群中}接下来看看open-hand-helm/pkg/agent/action/label.go::AddLabel()办法
func AddLabel(imagePullSecret []v1.LocalObjectReference, command int64, appServiceId int64, info *resource.Info, version, releaseName, chartName, agentVersion, testLabel, namespace string, isTest bool, isUpgrade bool, clientSet *kubernetes.Clientset) error { // 该办法内容比拟多,不在这里展现,具体可参考源代码。其作用就是依据不同的资源类型增加不同的Label值}3. Choerodon Agent 援用二次开发的helm库
参照helm3源码install命令的初始化形式,将分为以下几个步骤
获取helm配置信息
// 获取helm的配置信息func getCfg(namespace string) (*action.Configuration, *cli.EnvSettings) {settings := cli.New()settings.SetNamespace(namespace)actionConfig := &action.Configuration{}helmDriver := os.Getenv("HELM_DRIVER")if err := actionConfig.Init(settings.RESTClientGetter(), settings.Namespace(), helmDriver, debug); err != nil { log.Fatal(err)}return action config, settings}创立Install操作对象
installClient := action.NewInstall( cfg, chartPathOptions, request.Command, request.ImagePullSecrets, request.Namespace, request.ReleaseName, request.ChartName, request.ChartVersion, request.AppServiceId, envkube.AgentVersion, "", false)- 校验chart包并生成values值
`go ··· valueOpts := getValueOpts(request.Values) p := getter.All(envSettings) vals, err := valueOpts.MergeValues(p) if err != nil { return nil, err }
// Check chart dependencies to make sure all are present in /charts chartRequested, err := loader.Load(cp) if err != nil { return nil, err }
validInstallableChart, err := isChartInstallable(chartRequested) if !validInstallableChart { return nil, err } ···
4. 调用装置办法,执行装置命令···
responseRelease, err := installClient.Run(chartRequested, vals, request.Values)
···
具体的逻辑可查看[choerodon-cluster-agent/pkg/helm/helm.go::InstallRelease()](https://github.com/open-hand/choerodon-cluster-agent/blob/master/pkg/helm/helm.go#L172)总结来说就是以下4个步骤:获取配置对象->生成操作对象->校验chart包并生成values值->执行操作## 对已装置的Release进行迁徙对Release的迁徙须要用到helm迁徙工具,该工具是间接集成到Choerodon Agent我的项目代码中的。在Choeordon Agent的启动逻辑中,接管到的第一个命令是agent_init。该命令负责命名空间的创立和监听,因而Release迁徙逻辑也就放到这一步操作中。整个流程如下图所示: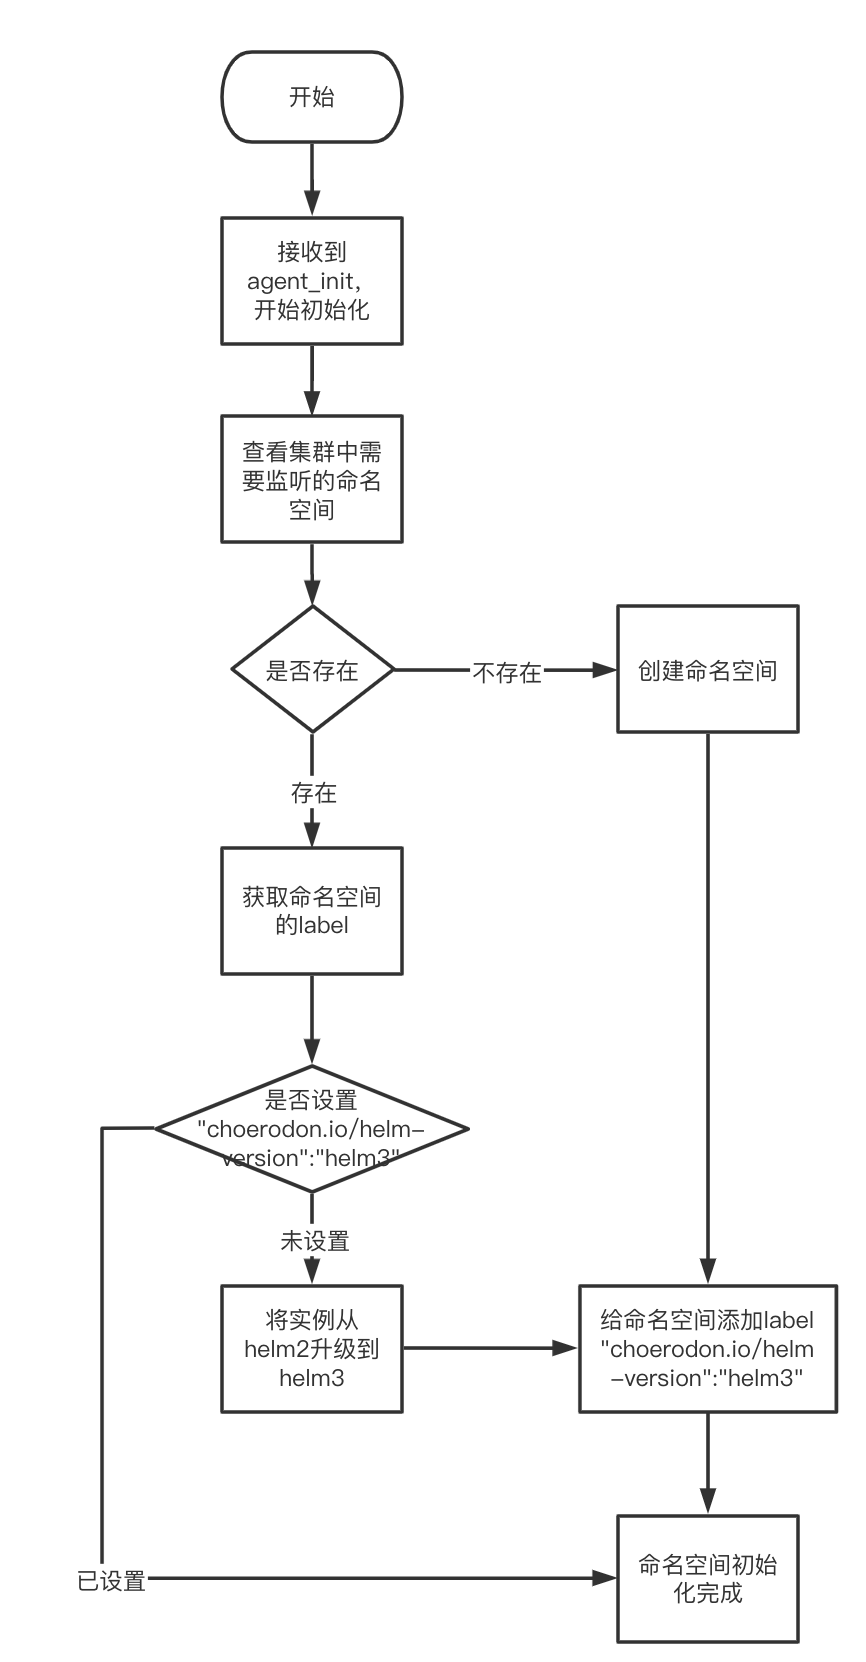1. 首先从[choerodon-cluster-agent/pkg/command/agent/agent.go::InitAgent()](https://github.com/open-hand/choerodon-cluster-agent/blob/master/pkg/command/agent/agent.go#L25)办法开始 ```go func InitAgent(opts \*commandutil.Opts, cmd \*model.Packet) (\[\]\*model.Packet, \*model.Packet) { // ···省略的步骤是解决初始化的参数// 上面的代码开始对须要监听的命名空间进行初始化 for _, envPara := range agentInitOpts.Envs { nsList = append(nsList, envPara.Namespace) err := createNamespace(opts, envPara.Namespace, envPara.Releases) if err != nil { return nil, commandutil.NewResponseError(cmd.Key, cmd.Type, err) } }// ···省略的步骤是开启gitops监听、controller监听、以及返回集群信息 }在choerodon-cluster-agent/pkg/command/agent/agent.go::createNamespace()开始初始化命名空间
func createNamespace(opts *commandutil.Opts, namespaceName string, releases []string) error { ns, err := opts.KubeClient.GetKubeClient().CoreV1().Namespaces().Get(namespaceName, metav1.GetOptions{}) if err != nil { // 如果命名空间不存在的话,则创立 if errors.IsNotFound(err) { _, err = opts.KubeClient.GetKubeClient().CoreV1().Namespaces().Create(&corev1.Namespace{ ObjectMeta: metav1.ObjectMeta{ Name: namespaceName, Labels: map[string]string{model.HelmVersion: "helm3"}, }, }) return err } return err } labels := ns.Labels annotations := ns.Annotations // 如果命名空间存在,则查看labels标签 if _, ok := labels[model.HelmVersion]; !ok { // 开始迁徙实例 return update(opts, releases, namespaceName, labels, annotations) } return nil}在choerodon-cluster-agent/pkg/command/agent/agent.go::update()中迁徙实例
`go func update(opts *commandutil.Opts, releases []string, namespaceName string, labels, annotations map[string]string) error { releaseCount := len(releases) upgradeCount := 0// 此处不对choerodon命名空间下的实例进行迁徙解决 // 装置agent的时候,会间接创立choerodon命名空间而不打上 model.HelmVersion 标签 // 而后用户间接创立pv,会导致choerodon没有标签也纳入环境治理(如果通过agent装置了prometheus或者cert-manager就会呈现问题) // 所以间接默认choeordon不须要进行helm迁徙 if namespaceName != “choerodon” && releaseCount != 0 { for i := 0; i < releaseCount; i++ { getReleaseRequest := &helm.GetReleaseContentRequest{ ReleaseName: releases[i], Namespace: namespaceName, }
// 查看该实例是否helm3治理,如果是upgradeCount加1,如果不是,进行迁徙操作而后再加1 _, err := opts.HelmClient.GetRelease(getReleaseRequest) if err != nil { // 实例不存在有可能是实例未迁徙,尝试迁徙操作 if strings.Contains(err.Error(), helm.ErrReleaseNotFound) { helm2to3.RunConvert(releases[i]) if opts.ClearHelmHistory { helm2to3.RunCleanup(releases[i]) } upgradeCount++ } } else { // 实例存在表明实例被helm3治理,尝试进行数据清理,而后upgradeCount加1 if opts.ClearHelmHistory { helm2to3.RunCleanup(releases[i]) } upgradeCount++ }}if releaseCount != upgradeCount { return fmt.Errorf("env %s : failed to upgrade helm2 to helm3 ", namespaceName)}}
// 增加label if labels == nil { labels = make(map[string]string) }
labels[model.HelmVersion] = "helm3"_, err := opts.KubeClient.GetKubeClient().CoreV1().Namespaces().Update(&corev1.Namespace{ ObjectMeta: metav1.ObjectMeta{ Name: namespaceName, Labels: labels, Annotations: annotations, },})return err} ` 由此实现了Choerodon Agent对Release的迁徙逻辑
常见问题解决
- 有时候Choerodon Agent重启后,会呈现启动失败的问题,查看日志有实例迁徙失败,tiller-pod不存在谬误
该问题可能是实例迁徙实现后,命名空间的label增加失败。解决办法是手动给该命名空间增加”choerodon.io/helm-version”:“helm3” 标签,以此示意该命名空间的实例迁徙已实现,不须要再次迁徙
- 批改资源后,部署失败,且错误信息提醒为超时
首先在devops的环境层查看三个commit值是否统一,有如下状况:
- 前两个commit不统一:阐明devops在gitlab的webhook回调解决上有问题,应该从gitlab的webhook执行记录以及devops日志进行排查
- 前两个统一,第三个落后于前两个:阐明devops同步相干gitops操作已实现,然而在Choerodon Agent同步gitops库上出了问题。
这时先保留一份日志,供开发人员查找剖析,而后kubectl -n choerodon delete [podName]删除Choerodon Agent进行重启。
如果重启实现后,Choerodon Agent依然没有同步gitops库,这时应该思考该环境库在gitlab的密钥是否与devops数据库中存储的统一。先在本地验证是否通过该密钥拉取gitops库。如果不行,重置该gitops库的密钥,最好的方法就是删掉该环境从新创立。如果能够,那么阐明Choerodon Agent与gitlab连贯有问题,查看gitlab的端口开发状况以及Choerodon Agent与内部网络的拜访连贯状况
- 三个commit都统一,然而实例部署失败,且提醒拜访chart仓库超时:这个问题常常遇到。排查后发现是Choerodon Agent与Chart Museum网络连接有问题
本文由猪齿鱼技术团队原创,转载请注明出处:猪齿鱼官网
对于猪齿鱼
猪齿鱼Choerodon全场景效力平台,提供体系化方法论和合作、测试、DevOps及容器工具,帮忙企业拉通需要、设计、开发、部署、测试和经营流程,一站式进步管理效率和品质。从团队协同到DevOps工具链、从平台工具到体系化方法论,猪齿鱼全面满足协同治理与工程效率需要,贯通端到端全流程,助力团队效力更快更强更稳固。戳此处试用猪齿鱼